The Callsheet train keeps on chuggin’! I’ve been lucky enough to catch wind of a couple of really delightful pieces about Callsheet.
Today, Jason Aten (of, among other things, Primary Technology), wrote a lovely piece about Callsheet for Inc. Jason and I spoke briefly via email, and the piece came out really well. I particularly liked (and yet was slightly horrified by 😆) this quote:
To be completely honest, the only thing I can think of wrong about Callsheet is that it is incredibly underpriced (it’s only $9 per year). I mean that with all sincerity, Liss should be charging three to five times what Callsheet costs, and it would still be an incredible value. Ultimately, it’s an app that is successful primarily because of how much value it adds to its users. That might be the simplest lesson of all.
This week’s Mac Power Users was all about Stephen and David’s favorite iPhone apps, and they were kind enough to say some really lovely things about Callsheet as well.
The segment starts at 7:40, and included this lovely quote from Stephen:
Casey does not charge enough for this subscription; I’ll say this publicly: he should charge more.
And from David:
Casey knows what he’s doing; I feel like this is the big winner for Casey. He’s made several apps over the years, but to me this is the one.
😊
This week I did something quite weird: I appeared on a Polish podcast. To make it even weirder, I did so as my Persona.
I joined Wojtek Pietrusiewicz in discussing all things Vision Pro. We tried to keep the episode to half an hour, but, I blew us a bit past. Whoops.
Interestingly, for me, having known Wojtek some but never having met in person, I found his persona to be a completely reasonable representation of… him. My own ignorance to his actual appearance made the Persona a perfect stand-in. Conversely, having seen me on video before, Wojtek was… less enthusiastic… about mine. 😆
You can also see the conversation yourself, as Wojtek recorded it and posted it on YouTube.
As one would expect, I seem to be doing a press tour discussing the Apple Vision Pro. It’s been discussed on ATP twice, as well as on Analog(ue). New today is my appearance with my friend Max Roberts on Max Frequency.
On this episode, we ease in by discussing the last year-and-change of Max being a dad, Max’s recent Part 107 certification, and how things are going with Callsheet. Then, the main course: a discussion of all things Apple Vision Pro.
I always enjoy my appearances on Max Frequency; this one was no exception. While you may be chock-full of Vision Pro opinions, I thought this one was a fun recap of my first week-or-so with the device.
Take a look at this panoramic photo that I took in 2022:
Note, specifically, the wall. Taken at face value, it looks like whoever built that wall was drunk as hell. It certainly doesn’t look like what you’d expect: a rectangle. I remember it that way: as a rectangle. However, since my memory is trash, I looked up where the photo was taken, and sure enough, my memory was accurate:

The distortion on the first photo is to be expected from a panoramic photo. Pretty much every time I have a straight line in the foreground, it ends up distorted. My brain can [usually] make up for that when I’m looking at the photo again.
Everyone seems to have their own favorite feature on the Vision Pro. It may be watching movies, or watching spatial (3D) videos that you’ve captured, or perhaps the amazing Mac Virtual Display. Though MVD is probably my favorite, panoramas are becoming a close second.
Thankfully, I have occasionally taken panoramic photos in the past, and naturally, I’ve been going through them in the Vision Pro. When I opened up the one above, I was stunned. Naturally, I can’t properly represent what it feels like, but I can take a stab at showing you what it looks like:
The Vision Pro has un-distorted the image.
🤯
How incredibly cool. Consider me both surprised and delighted.
A Valentine’s Day surprise happened to me yesterday: something exciting was called to my attention:
Callsheet has won an Editor’s Choice award in the App Store!!
I couldn’t can’t believe my eyes.
Look at it!
I’m not sure exactly when this landed, but I’m absolutely overjoyed about it.
As an added bonus, it shows up in search results too:
I’m not sure who at Apple made this selection, but know I’m forever thankful to you. 💙
Thanks to this, and the Upgradie, Callsheet is now a multi-award winning app. That’s pretty great. 😊
This is my desk, today. Captured in situ, which is to say, messy as it always is:
Upon it, from left-to-right:
- A LG UltraFine 5K that was graciously given to me
This monitor lives on my desk in the winter and is mostly used on the back porch in summer. - An Apple Studio Display
- A LG UltraFine 5K that I bought secondhand from a podcaster friend
This is, by my count, 44,236,800 pixels of real estate[1]. I could absolutely get my work done in a single 5K display. I’ve found over the last couple years that I prefer to use 2× 5K. And if I have another just sitting around during the winter, why not add a third? It’s a bit overkill, but, #yolo.
Having all this space lets me spread out while I do my work. I organize things by display, and generally, it’s something like this:
- Left: Things I don’t look at often, like mail/RSS/mastodon, as well as general-purpose browsing
- Center: Xcode & iOS Simulator
- Right: Git, documentation, Safari for research purposes. I also use a second Space (virtual desktop) here which runs Slack and Messages in split-screen.
I love this setup, until I leave it. Much like independent workers who are “unemployable” after enjoying just a few months of indie life[2], I feel hamstrung when I work elsewhere. Which I like to do at least once a week. I have stopgap measures, but they’re not great.
As I write this, we are a week-and-a-day away from consumers getting their hands on Apple Vision Pro. This ludicrously expensive device seems to be much like the Apple Watch — it has an ostensible purpose, but nobody really knows what consumers will actually do with it. For the Apple Watch, the purpose was fitness (or notification triage). For Apple Vision Pro, it’s entertainment, at least to start.
In thinking about where an Apple Vision Pro will fit in my life, I kept coming up short. I suspect it will be the best device in the house upon which I could watch a movie — quite a bit better than even my LG C9 and my beloved Sonos home theatre. However, watching something on Apple Vision Pro is an inherently solitary endeavor. My family can’t watch the movie I’m watching when it’s being blasted directly into my eyeballs.
I can absolutely imagine Apple Vision Pro being a phenomenal device when used on planes or trains. For better and for worse, I just don’t have the occasion to do so particularly frequently. I have made one plane journey since 2019, and one train journey.[3]
Standalone, I’m not entirely convinced Apple Vision Pro is for me. While I’m sure I’ll enjoy the rare occasions I get to use it without snubbing those around me, I don’t see those situations as being frequent enough to justify the considerable price tag.
Over the last week or so, as I debate how silly it was for me to preorder an Apple Vision Pro, I’ve found myself growing more and more excited about receiving it. This is unusual for me with Apple products, where I usually have an immediate crash of enthusiasm after a purchase. Not quite buyer’s remorse, as much as “oh, well, that’s done”. With Apple Vision Pro, I find my enthusiasm and excitement is 📈. Why?
It’s because my perspective has changed.
I remain mostly ho-hum about Apple Vision Pro as an entertainment device. Not because I doubt its capabilities — far from it. More because I just don’t have the occasion for a lot of solo media consumption today, so why would tomorrow be any different? It’s not you, it’s me.
However, with each passing day, I get incredibly excited about the prospect of Apple Vision Pro as a tool for getting work done. Though I’m very happy with my desk setup — lack of tidiness notwithstanding — it would be amazing to be able to bring that setup elsewhere.
With Apple Vision Pro, I reckon I will be able to.
Apple Vision Pro may be the best Mac accessory Apple has ever created.
Yesterday was an odd day, in which I spent time working at two different local libraries. While I was there, I realized that I am a week and change too early. If I had my Apple Vision Pro with me, I could have the workspace of my dreams, all with only my MacBook Pro and Apple Vision Pro.
Apple Vision Pro supports… uh… sucking-your-Mac-into-the-virtual-world mode. A 4K version of your Mac’s screen appears in the virtual space, but you can still interact with your Mac using its own keyboard and mouse.
That would allow me to build something like this extremely poor rendering shows:
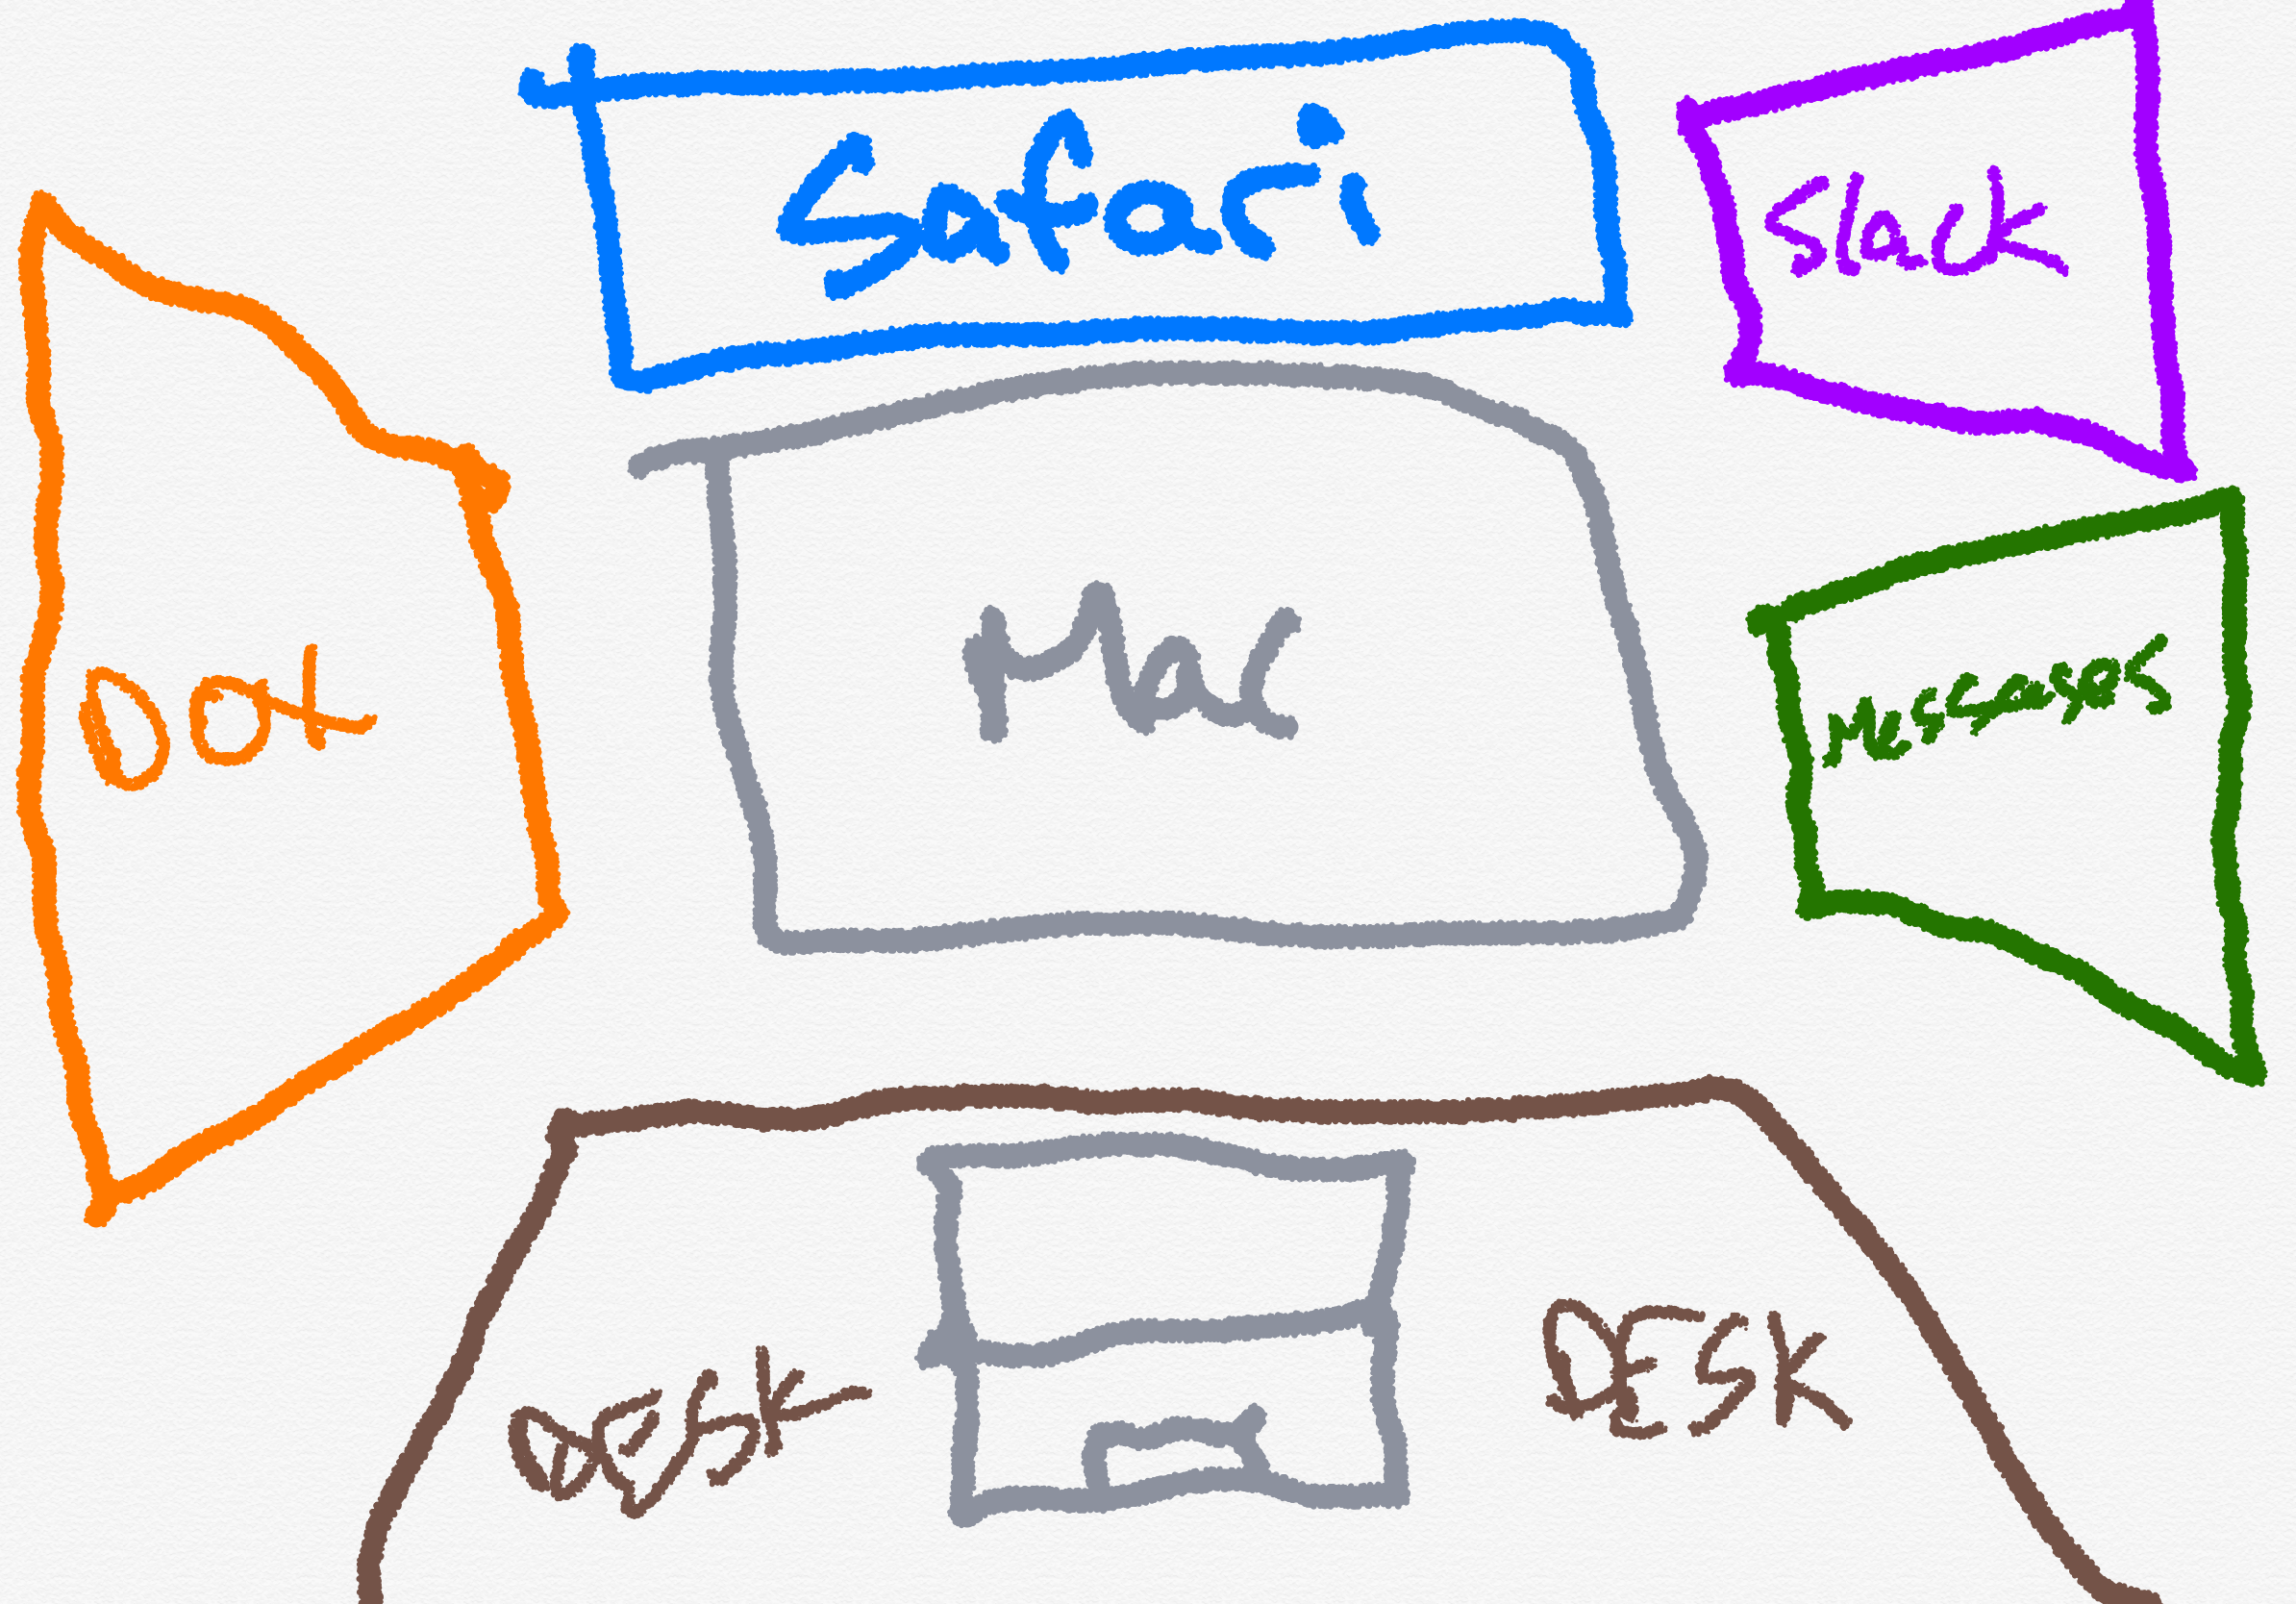
In this, I envision Slack and Messages to be the visionOS-native versions. I’m intermingling native visionOS apps with my Mac; the latter’s “monitor” is simply one window in the virtual space. That window, showing my Mac’s screen, can be surrounded by several visionOS-native apps as I see fit. The marriage of macOS and visionOS.
You know what’s better than 44 million pixels of real estate? ∞ pixels of real estate.
Now, imagine I could take things further. What if visionOS also supports Universal Control, between macOS and visionOS? Imagine I get a message in Slack or Messages, then I simply cast my gaze over to the visionOS-native app, and then start typing a response on my Mac’s keyboard.
🤯
This could genuinely level-up my ability to get my work done when away from the house.[4]
I remain blasé about Apple Vision Pro, standalone entertainment device. With each passing day I get more and more amped for Apple Vision Pro, my MacBook Pro’s greatest accessory.
The future isn’t here yet, but if Apple has done what I expect, it arrives on the second of February.
And I couldn’t be more excited.
Roughly 24 million pixels more than you XDR folks. So there. ↩
I try very hard not to be unemployable, as you never know what the future holds. Here’s hoping I either never need to find out, or I can ease into the real world with grace if the time comes. ↩
Have y’all heard about trains? They rule. We Americans should look into these things more. ↩
Assuming I can get past the social stigma of being that guy. It didn’t take long with AirPods; I presume it’ll happen eventually with Apple Vision Pro too. ↩
We’re not even three weeks into the new year, but I’ve spent a fair bit of time
procrastinating from working on Apple Vision Pro stuff working on updates for
Callsheet. Today’s, in particular, is worth calling attention to.
In today’s update to Callsheet — version 2024.4 — I have fixed something that has driven users absolutely mad. I kicked the can down the road repeatedly, in part because I was trying to over-complicate the solution. I also did because this particular thing didn’t bother me that much
…until it did.
Erin and I were watching Oppenheimer, and I was curious who played the role of Albert Einstein. Oppenheimer has a ton of actors in it, and it took an annoying amount of scrolling to find the actor in question. I knew that my users were right: there needed to be some sort of affordance for searching within these lists.
Now, there is. Simply swipe down to expose a standard, system search field:
Hopefully this will resolve most people’s largest issue — including me. 😊 Note to self: listen to your users.
In addition to a plethora of bug fixes, I also added another minor feature: the ability to grab a Callsheet link (rather than web link) via the sharrow. If you happen to know that the person you’d like to send a link to is also a Callsheet user, you can now send them a link that iOS/iPadOS will open directly in Callsheet.
When you tap on a sharrow, you’ll now get a menu, where you can choose which to share:
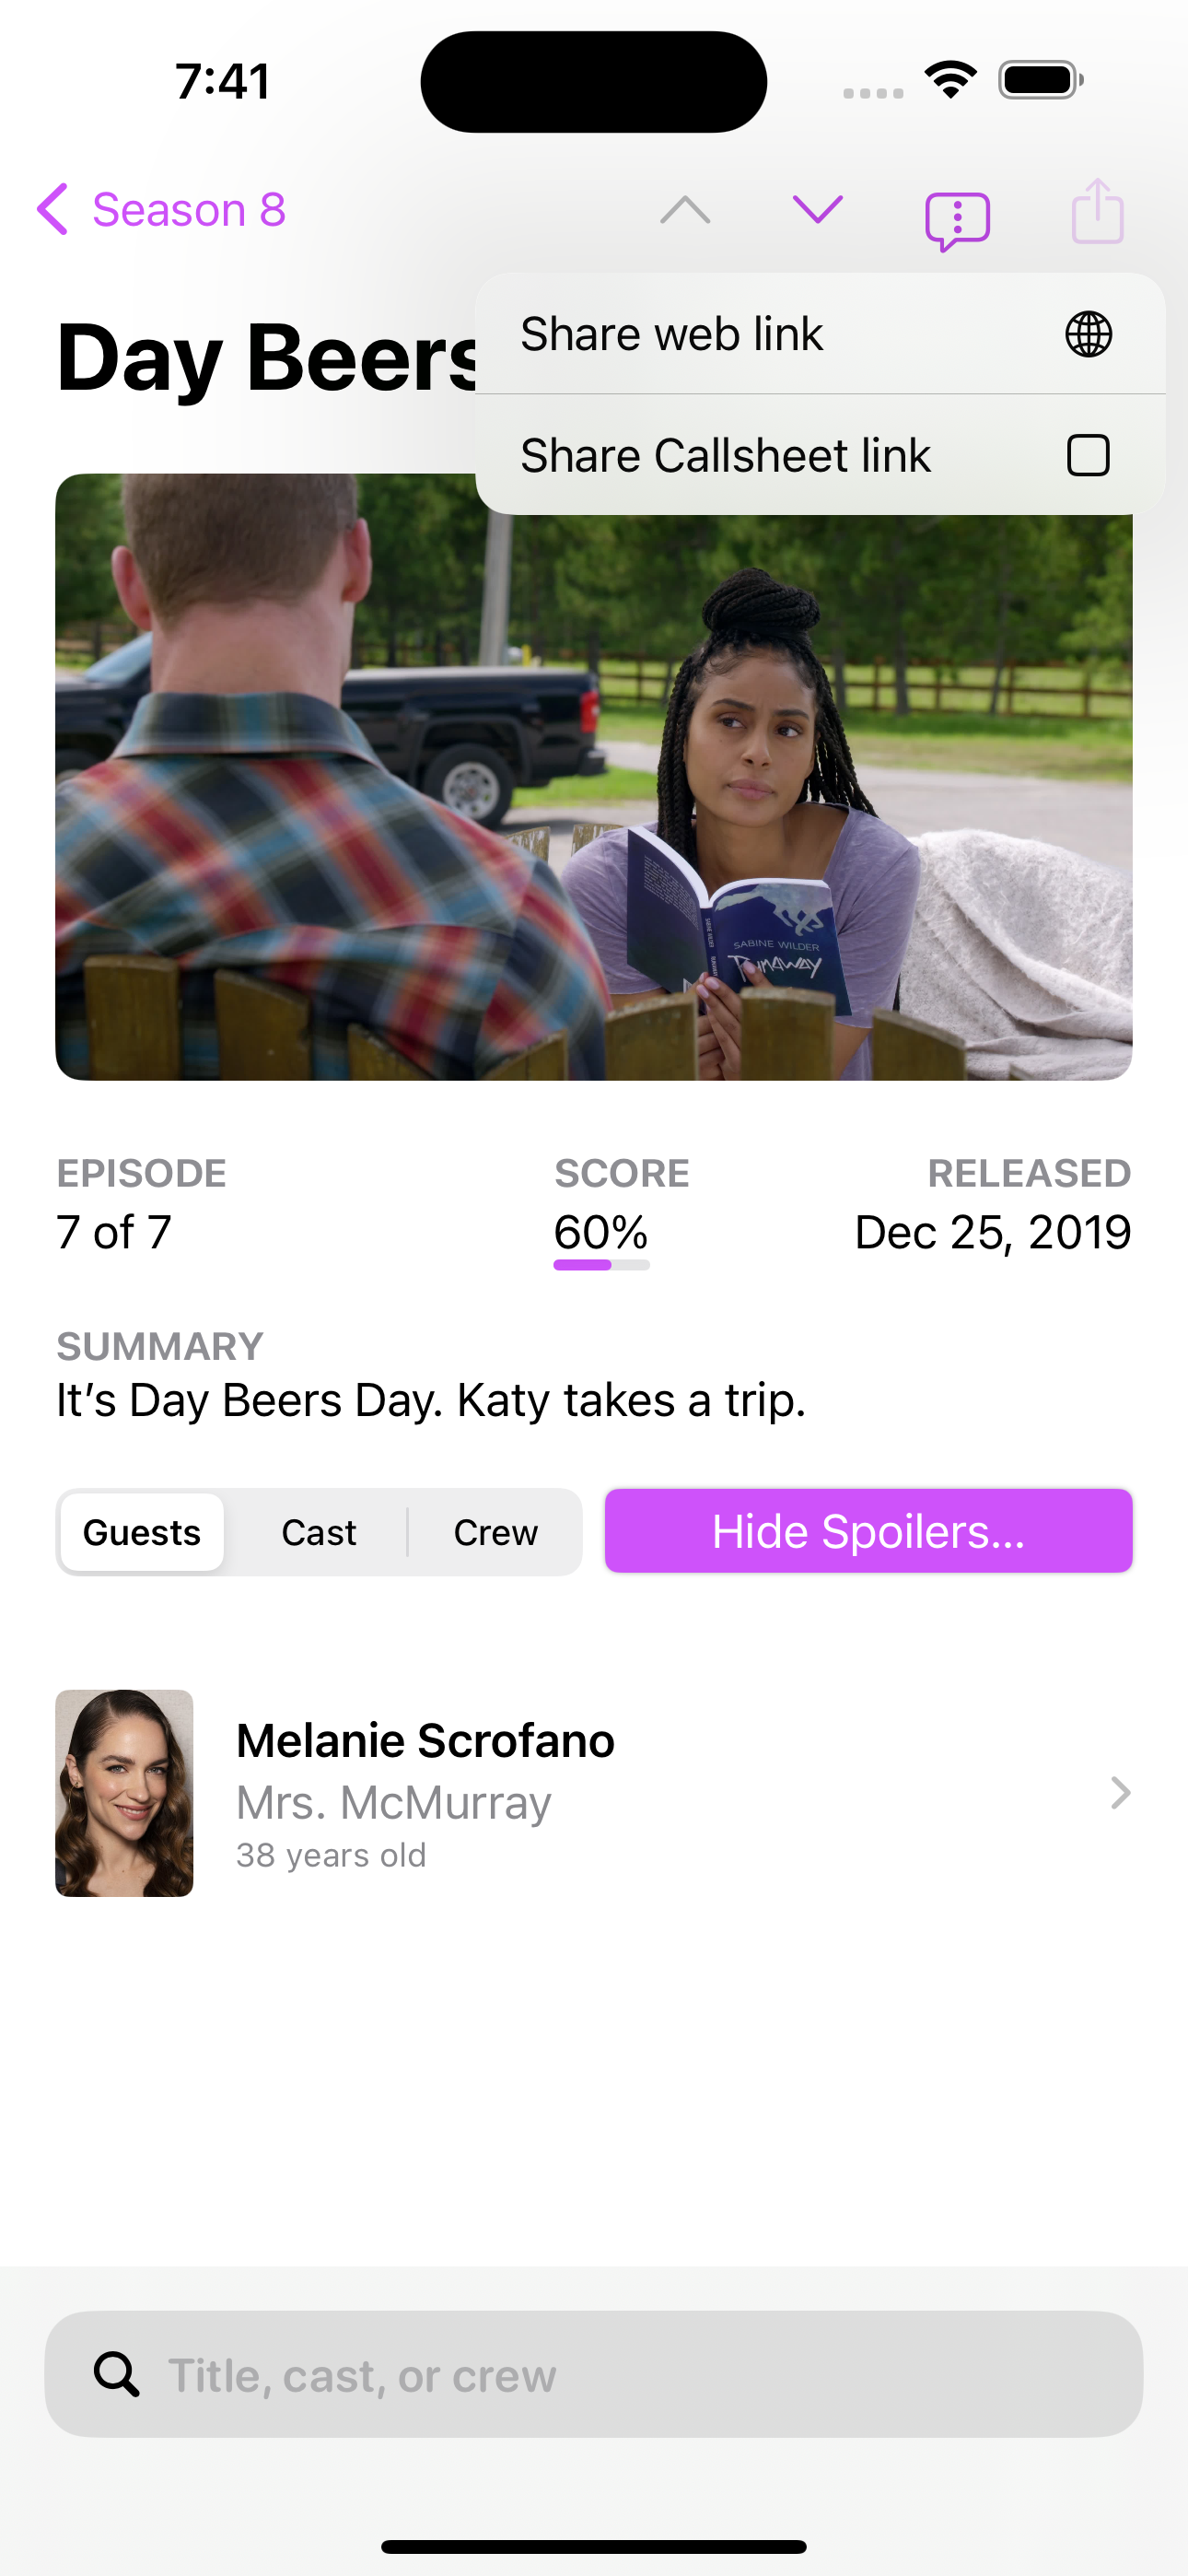
Wherever possible, deep links are supported. The above would have shared this link.
In addition to the above, there’s also been a ton of bug fixes, which are detailed in the app’s release notes on the App Store, because I’m not a jerk.
Version 2024.4 is rolling out slowly now, but if you’re impatient, open up
the App Store and search for Callsheet. That should offer you the option
to Update and thus jump the queue.
Eking in just before the new year, I joined my friend John Gruber on his seminal podcast, The Talk Show. While we set out to cover Apple’s 2023 and do a year-in-review, we got quite far off the rails… quite often.
Sorry, not sorry. 😏
When John and I started recording on Friday night, I don’t think either of us set out to record a roughly 200-minute podcast, but sometimes, it just gets good to you, and you just don’t want to stop.
I had a ton of fun bouncing stuff off of John, and vice versa. This episode is the perfect way to close the book on 2023, and open 2024.
If you are very lucky, you can point to a moment when you feel like you can say to yourself, “I’ve arrived”.
Yesterday, I arrived.
I was absolutely beaming, with my family around me, as we all listened to this week’s Upgrade, which included the tenth annual Upgradies. Thanks to Myke and Jason, I can now honestly say
Callsheet is an award winning iOS app!!
Callsheet has won the award for Best Newcomer iOS App!

This is an immense honor, and has affected me quite a lot, in the best possible way. With my prior apps, I was/am proud of them, but they are a very different caliber of app. Callsheet is more impressive, and it feels amazing to have my efforts (and those that assisted me!) publicly recognized.
Maybe I really am a professional app developer after all, huh? 😏
My tremendous thanks to Jason, Myke, and all the Upgradians who voted for me. It really, truly, means the world to me. 💙
A couple weeks ago, I joined my friends Rosemary Orchard and David Sparks on their show Automators, which is all about the many different ways you can automate/improve your life.
My forgetfulness to write this post should not be indicative of a lack of enthusiasm. 🫣😬 I really did have a lot of fun!
On our episode, we discussed my history with home automation, dating all the way back to my dad’s X10 setup back when I was in high school. We discussed some weird issues I’ve been having with some of my automations, as well as ways to improve the ones that are already working properly.
Both David and Rosemary are a veritable wealth of information, and I think a lot of the things we discussed are inspirational — if not applicable — to many.