Today we had a “hack day” at my company. We get to spend the day working on something that’s at least tangentially related to what we do day-to-day, but doesn’t have to be directly applicable. Today, I finally got around to trying Sourcery.
Sourcery is a code generation tool for Swift. It is particularly well suited for auto-generating code that is very repetitious; code most developers refer to as “boilerplate”. Some examples that come to mind:
EquatableimplementationsHashableimplementationsstructinitializers- Lens implementations
The documentation isn’t super obvious at a glance, so I’m writing this to serve as a quick primer to get you going.
Let’s start with a basic Mac command line app, just to keep things simple. This app has a basic type:
struct Person {
    var firstName: String
    var lastName: String
    var birthDate: Date
    var age: Int {
        return Calendar.current.dateComponents([.year],
                                               from: birthDate,
                                               to: Date()).year ?? -1
    }
}
This type has a trio of normal properties, and one computed/read-only property.
In Swift, in order to compare the equality of two Person instances, we need to
implement a protocol called Equatable. To do so is trivial—at least in
this case:
extension Person: Equatable {
    static func ==(lhs: Person, rhs: Person) -> Bool {
        guard lhs.firstName == rhs.firstName else { return false }
        guard lhs.lastName == rhs.lastName else { return false }
        guard lhs.birthDate == rhs.birthDate else { return false }
        return true
    }
}
However, imagine doing this across ten types. Across fifty. How many structs
and classes are in your project? Implementing these constantly is rote work,
and not really what I’m being paid for. For repetitive tasks like these, is
there any way to automate them?
There is, and it’s Sourcery.
Sourcery allows you to auto-generate code based on templates. Those templates can be written in several templating languages; for the purposes of this post, I’ll be concentrating on Stencil.
The combination of Sourcery and a Stencil template allows us to auto-generate
an Equatable implementation for every one of our types.
Our template looks like this:
{% for type in types.implementing.AutoEquatable %}
// MARK: {{ type.name }} Equatable
extension {{type.name}}: Equatable {
    static func ==(lhs: {{type.name}}, rhs: {{type.name}}) -> Bool {
        {% for variable in type.storedVariables %}guard lhs.{{variable.name}} == rhs.{{variable.name}} else { return false }
        {% endfor %}
        return true
    }
}
{% endfor %}
Let’s explore the important lines:
{% for type in types.implementing.AutoEquatable %}
Here, we’re enumerating on every type in our project that implements AutoEquatable.
AutoEquatable is simply a marker protocol:
protocol AutoEquatable {}
We use it, in concert with this precondition, to allow us to opt in to
auto-generation of an Equatable implementation. If we want to write our
Equatable by hand, we do so. If we want to have it auto-generated, we simply
add the marker protocol to our type:
extension Person: AutoEquatable {}
Coming back to our template, we are now in our enumeration of all the types
that implement AutoEquatable. For each of those types, we create the
extension for the type in question, and the required function:
extension {{type.name}}: Equatable {
    static func ==(lhs: {{type.name}}, rhs: {{type.name}}) -> Bool {
In this function, we need to do a comparison for each of the stored properties
in that type. Properties like Person’s age aren’t stored, and thus, don’t
need to be compared. Sourcery makes that happen for us too:
{% for variable in type.storedVariables %}guard lhs.{{variable.name}} == rhs.{{variable.name}} else { return false }
The above basically says “for each of the stored variables in this type, do a comparison”. The rest of the template is pretty self-explanatory.
Do note, however, that I’m leaving a lot of stuff out of this template, for brevity’s sake. I strongly encourage you to check out the sample template that Sourcery provides.
Performing Code Generation
Now, we need to use Sourcery to perform the generation. Starting from
our sample app, we can download the Sourcery binaries, and
include them in our project. In this case, I’ve put it in
./Resources/sourcery. You can see it here.
Now, we can run Sourcery on our files.
Assuming we’re in our project’s home folder—the folder that has our
SourceryDemo.xcodeproj in it—we run it as such:
./Resources/sourcery/bin/sourcery
   --sources ./SourceryDemo
   --templates ./SourceryDemo/Templates/
   --output ./SourceryDemo/Autogenerated
You can see the result of Sourcery’s magic here:
// Generated using Sourcery 0.5.9 — https://github.com/krzysztofzablocki/Sourcery
// DO NOT EDIT

// MARK: Person Equatable
extension Person: Equatable {
    static func ==(lhs: Person, rhs: Person) -> Bool {
        guard lhs.firstName == rhs.firstName else { return false }
        guard lhs.lastName == rhs.lastName else { return false }
        guard lhs.birthDate == rhs.birthDate else { return false }
        return true
    }
}
Sourcery has generated exactly what we wanted: a func ==() that will compare
each of the stored properties on Person. Neat-o!
Automatic Regeneration
What happens if we want to make changes to our template, and then very quickly
see the results? Flipping back and forth between our template and Terminal.app
is tedious and frustrating. Luckily, Sourcery has a solution for this. If you
add the convenient --watch option to your command line, it will stay open,
constantly watching for changes in your templates and your source files.
Take this a step further, and you can watch your changes happen in real time. My old friend, Visual Studio Code is a great helper here:

As you can see, the moment I hit ⌘-S to save the template, the Swift code is automatically regenerated. Neat stuff.
It’s worth noting that Visual Studio Code doesn’t ship with Stencil highlighting
by default. To install it, press ⌘-T and then enter the command ext install stencil.
Pre-Build Step
Once you have your templates squared away, presumably by writing them in concert with Visual Studio Code, you still don’t want to generate new ones by hand. What happens if you add a new type? Sourcery will pick this up automatically, but only if you re-run it.
We can easily ensure that Sourcery is run every time we build. We can add a pre-build
step in Xcode. To do so is easy. Select your target in Xcode, and then select the
Build Phases tab. You can add a new one:
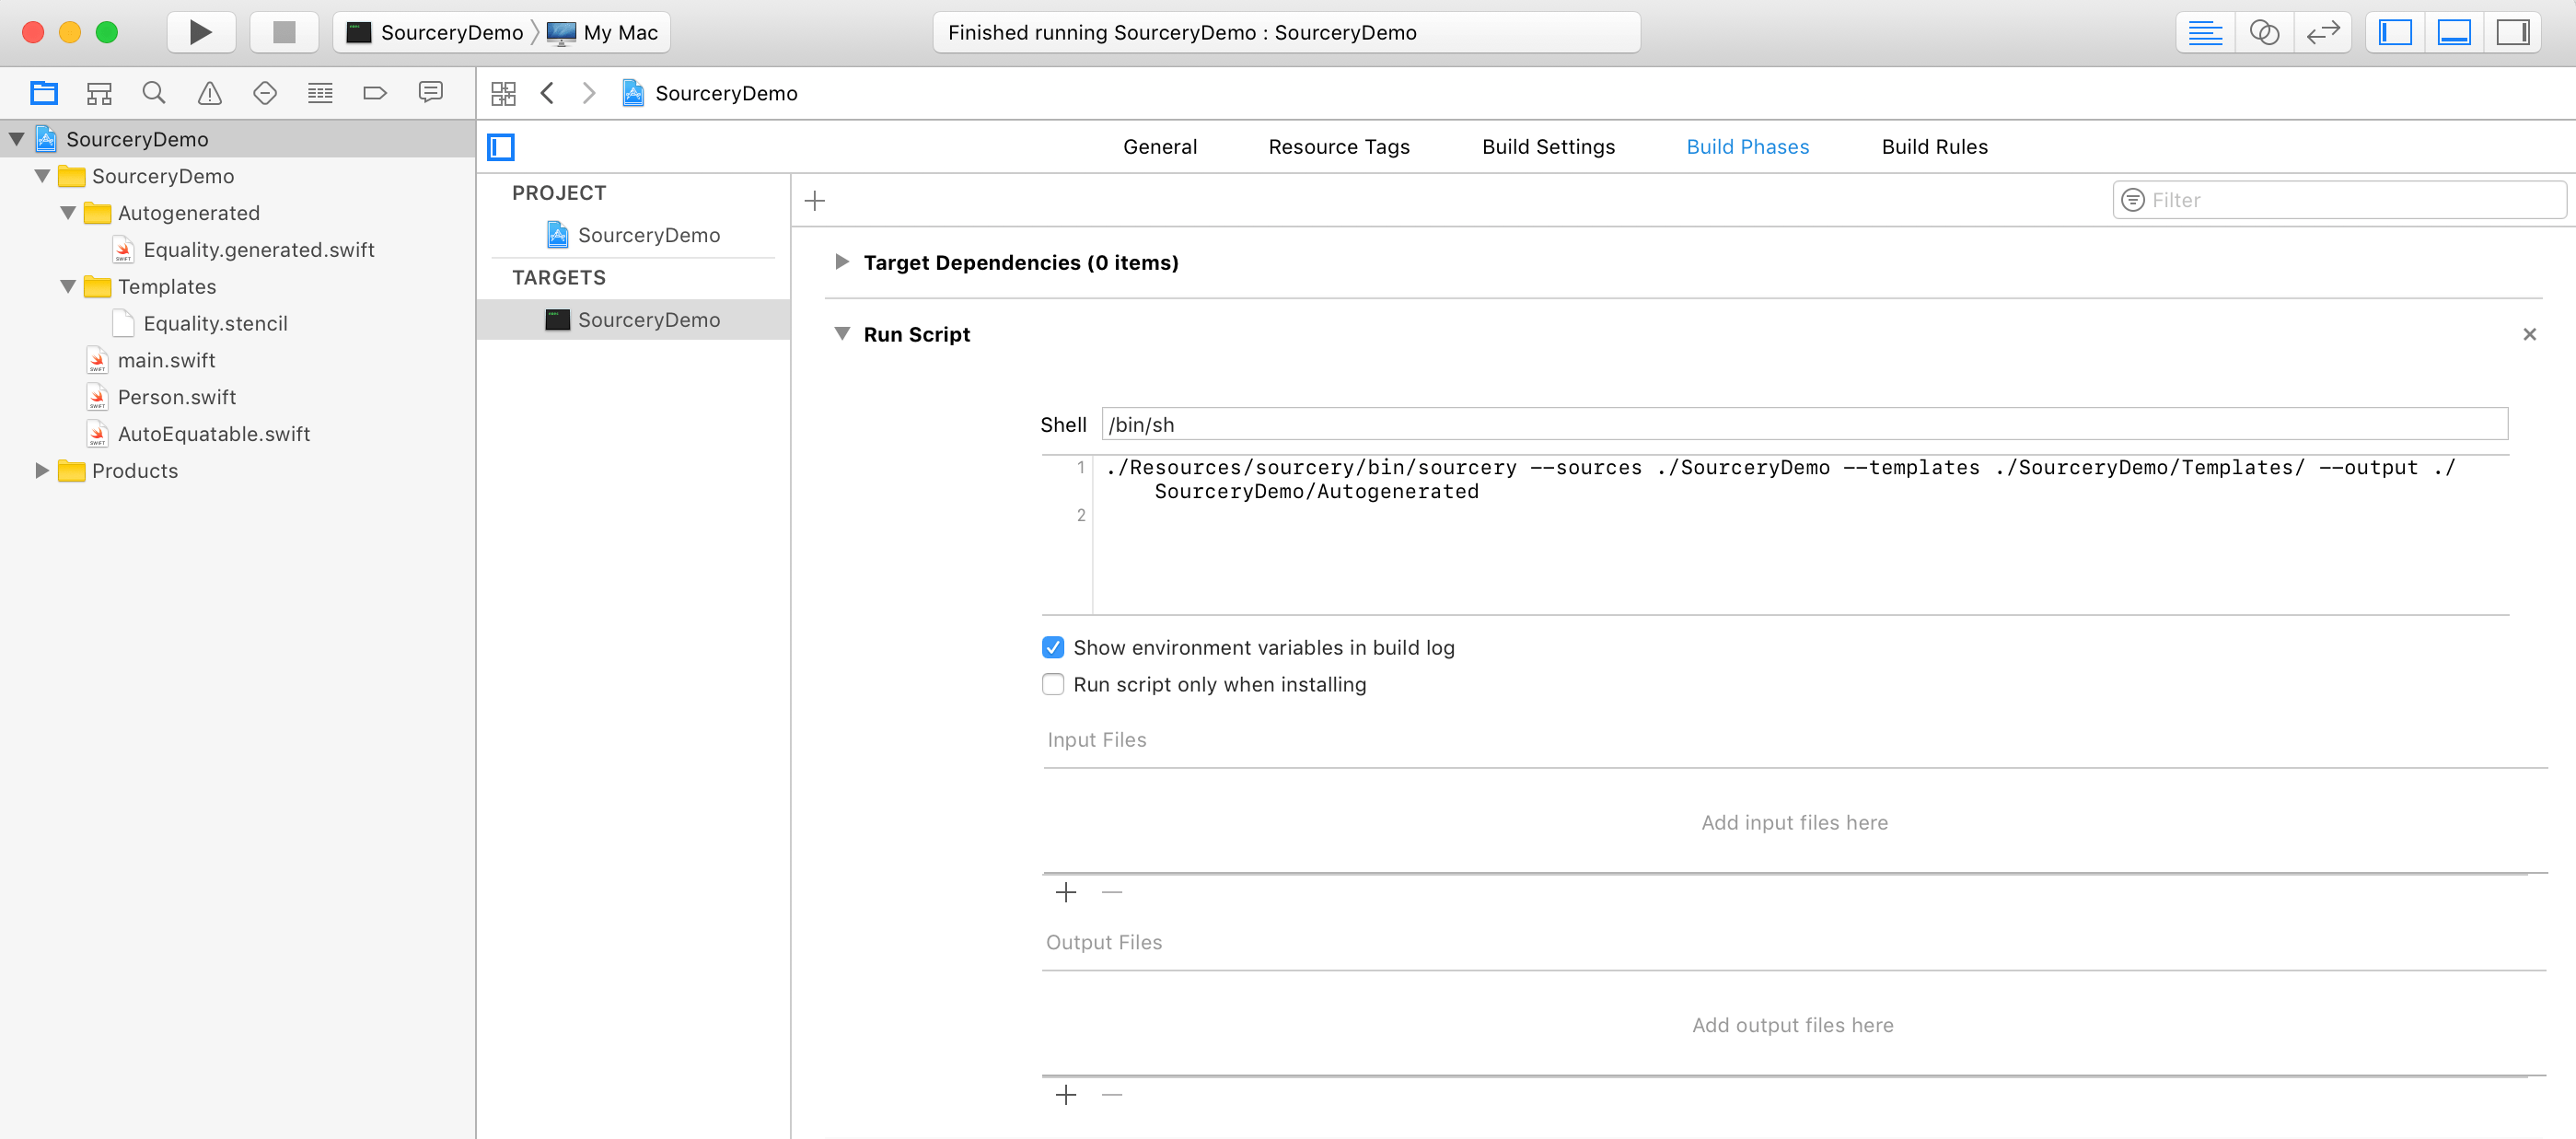
Now, every time we build, the first step will be to refresh the Sourcery output.
Way Forward
Though what I did today was simply a proof of concept, my intention for Monday is to spend some time integrating Sourcery into our real projects.
Should you wish to see my setup, I have put a sample project on Github. If you look at the commit history, you can walk through each step, much like I did with my RxSwift primer.

I was a guest on this week’s episode of Pragmatic, a podcast about nerdy things by nerdy people.
On this episode, John and I discussed the merits and drawbacks of the metric and imperial units of measure. This is a topic that I’ve discussed numerous times on Twitter. As an Australian, John had some, let’s call them, differing viewpoints.
I had a lot of fun making an impassioned plea for… some things. As it turns out, my position on metric versus imperial is more nuanced than perhaps even I expected. You’ll have to listen to see what parts of imperial I defended, and what I was embarrassed by.
Today I joined Dan Moren, Aleen Simms, and Jason Snell on Clockwise. On today’s episode, we discussed video games we’re either playing or looking forward to, the rumored 10" iPad Pro, video streaming services, and platform envy.
Clockwise is such a blast to record; if you haven’t listened to it, you should really give it a shot.
Making my triumphant return to The Incomparable, I appeared on today’s episode, covering The Rocketeer (Amazon, iTunes). This is one of my favorite movies, and like Hunt, one that I’ve loved since I was a boy.
I was joined by David Loehr, Dan Moren, Joe Rosensteel, and of course, Jason Snell. The episode was a ton of fun, and I’m glad the panel was all die-hard Rocketeer fans like myself.
Appearing on The Incomparable is truly an honor, and I’m so glad I got asked to come back.
When I wrote the Node portion of my push notification toolchain, I was
doing so because I wanted to be able to simply cURL a URL, without having
to worry about HTTP verbs, headers, or anything else. The Node endpoint proxied
my requests for me, so that I didn’t have to worry about anything but a title and
a message.
At the time I hadn’t written any sort of local script, so being able to do
curl http://localhost/performAPush?title=Hi&message=Done
was helpful. It wasn’t until I wrote the done script that it became apparent
that my Node proxy wasn’t really providing any value anymore.
As Jon noted via Twitter, this isn’t strictly speaking necessary. cURL
can do all of this for me, if I’m willing to do so. I could script this out
such that a shell script of some sort does the heavy lifting, rather than an
endpoint on my web server, or having to remember all the requisite cURL
options.
Paul DeLeeuw came to a similar conclusion, and put together a nice walkthrough of a PHP script he wrote to get the job done. By taking this approach, Paul didn’t need a web server; he’s tickling the Pushover URL directly.
At work we recently switched from Cocoapods to punic. The reasons why are irrelevant for the purpose of this post. However, one of the traits of using punic is very long build times when you’re building all your dependencies. On the plus side, builds of our project tend to be pretty quick.
On the occasions that I do need to run a punic build, I often want to start
working on something else while I wait. However, I also want to know the moment
that the build is done, so I can continue working on our app. Thanks to a
combination of a shell script, a web server, and Pushover, I can.
Pushover is a free service that will convert emails or API calls to push
notifications to their native app. They also have an API you can use to perform
a push. I have a URL that I can hit that will transform a HTTP GET with a
couple parameters to a call to Pushover’s API. Here’s my code written for
Node, as an example.
function (response, query, request) {
  new Promise(function (resolve, reject) {
    var options = {
      'url': 'https://api.pushover.net/1/messages.json',
      form: {
        token: "{pushover token}",
        title: query.title,
        message: query.message,
        user: "{pushover user}"
      }
    };

    Request.post(options, function(err,httpResponse,body) {
      if (err || typeof(body["errors"]) !== "undefined") {
        reject(body["errors"] || err);
      } else {
        resolve();
      }
    });
  }).then(function() {
    response.sendStatus(200);
  }, function (error) {
    response.status(201).send(error);
  });
}
I can call this with a URL such as:
http://localhost/performAPush?title=Some+Title&message=Some+Message
This URL is extremely easy to tickle using cURL. I can make it even
easier to call by automatically URL encoding the input using
php. This is written for fish but
wouldn’t be hard to do in any other shell:
#!/usr/local/bin/fish

set escaped (php -r "echo urlencode('$argv');")
curl -s "http://localhost/performAPush?title=Done&message=$escaped" > /dev/null
So I can call that script, which I’ve called done, as follows:
> ~/done punic build is complete!
Which results in this hitting my watch:
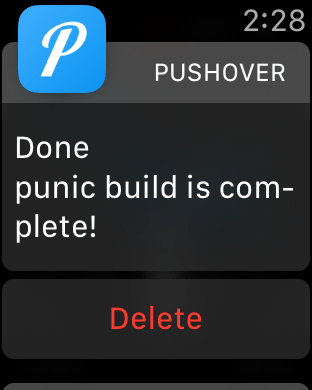
Putting it all together, I can do something like this (again, fish shell syntax):
> punic build; ~/done punic build is complete!
Now I can walk away and take care of other things, but still know the moment my build is ready.
Today Myke released episode 100 of Analog(ue).
It’s been a long road. We first started discussing this project as a side thing before Relay FM. We scrapped it, at the time, only to revisit it as one of the launch shows for Relay FM. Over two years later, our plucky feelings show has made it to episode 100.
For this episode, we wanted to do something special. We kicked around a few different ideas, but Myke ended up on a great one: a Newlywed Game style competition, to see which one of us knows the other better. We asked our mutual friend Jason Snell to moderate.
This episode was a ton of fun to record, and we are indebted to Jason for being such a great moderator/adjudicator. Whether or not you care for the show in general, you may really enjoy this one. I sure did.
I was given, for free, a network attached storage device in 2013. When I got it, frankly, I wasn’t too sure what to do with it, nor what problem in my life was really being solved by it. Nonetheless, I was excited to get a very expensive piece of equipment for free, and figured I’d do something with it.
Nearly four years on, I can’t imagine my computing life without this little box.
A friend asked recently if anyone had any resources for weighing the pros and cons of buying a NAS, and further, how one should set up said NAS. This post is not a definitive guide, but rather, an exploration of what I’ve done. Some of that may work for you. Some may not, and that’s okay.
As with any advice you get on the internet, take it with a copious amount of salt.
What the hell is a NAS anyway?
In short, more electronic storage space than you could ever want in a box that connects to your network.
To wit, a NAS is one or more hard drives—often the big clunky (but cheap!) ones we used to put in our tower PCs when we were younger—in a box that connects to your home (or office) network via ethernet. The box that houses these drives is itself a small computer, that can often perform tasks that actually have nothing at all to do with storing data.
For me, there are two key benefits to having a NAS:
- Having effectively infinite storage at home, for anything I damn well please
- Having an always-on computer to do basic tasks that I don’t want to have to dedicate an actual computer to doing
What do I have?
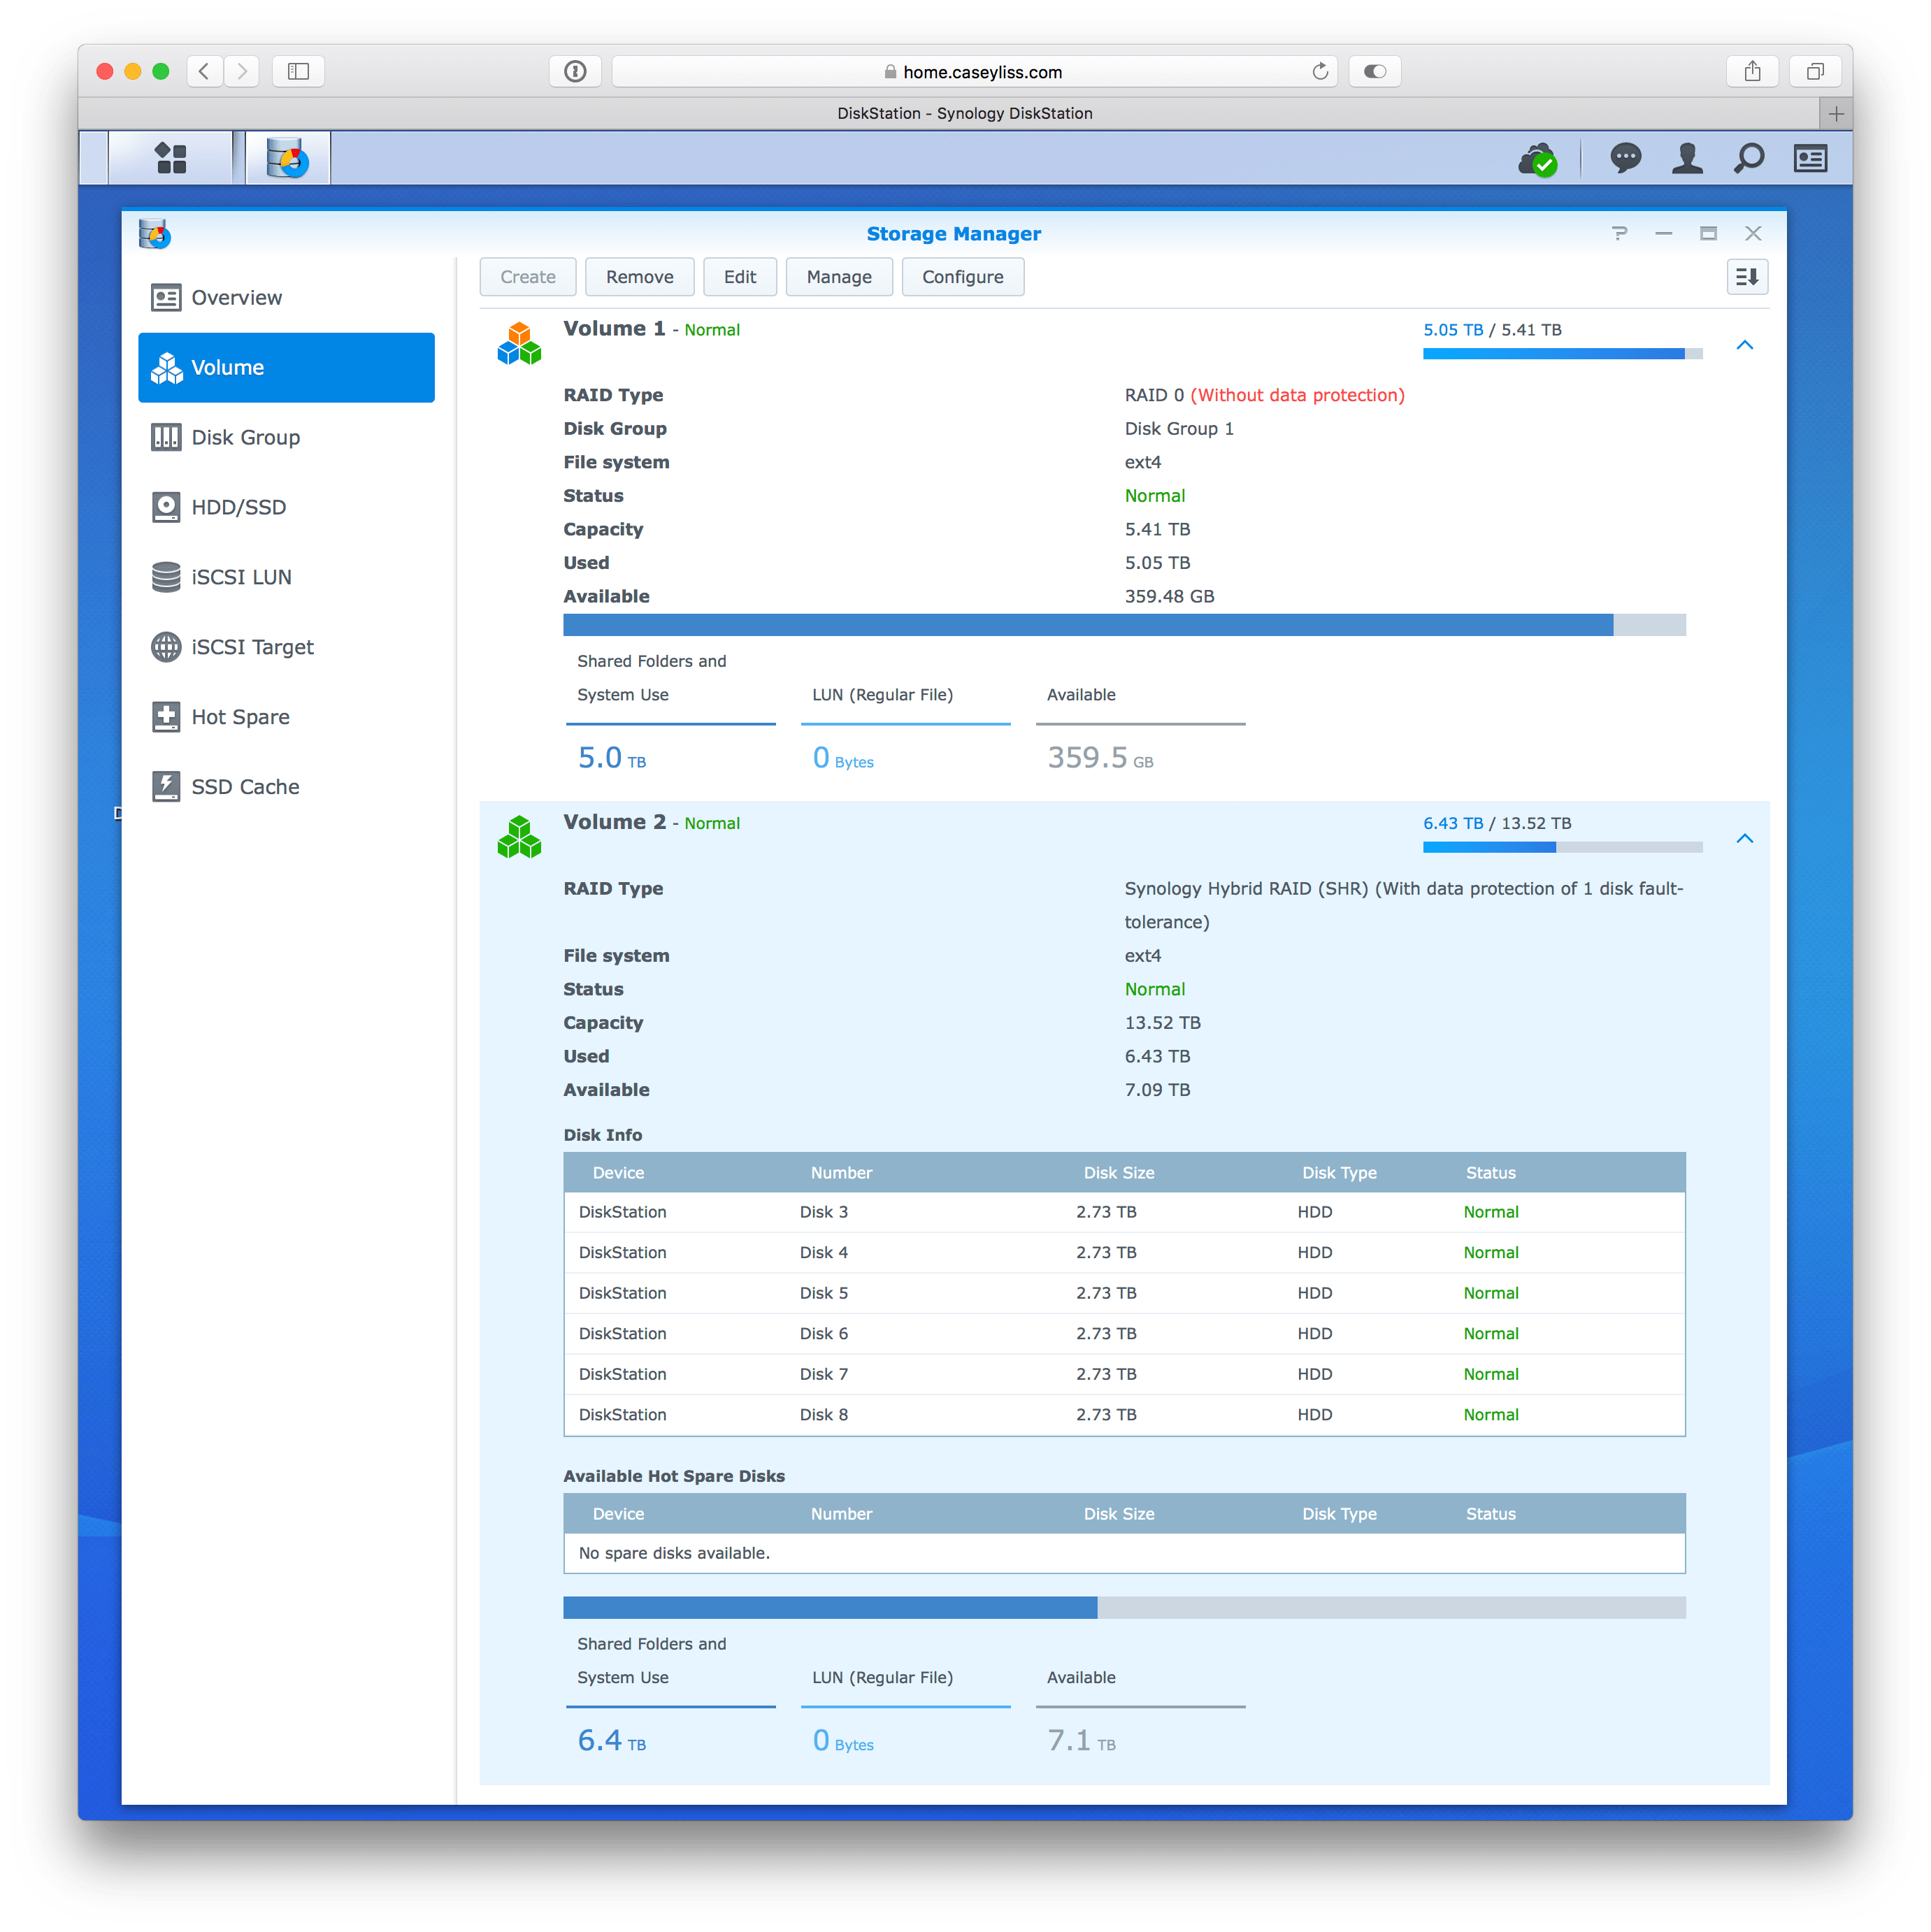
I have a now-outdated model, the Synology DS1813+. In my
understanding of the Synology D-series nomenclature, the The 8 indicates it’s
8-bay, and the 13 indicates it’s a 2013 model.18 indicates the
total number of supported disks (with expansion boxes) and the 13 indicates
it is a 2013 model. Mine has since been replaced by the 1815+:
8-bay, 2015 model.
On Synology’s website, the 1815+ is part of the “plus series”, which is intended for “Workgroup/Small & Medium Business”. Quite clearly, that’s overkill for a family of three. But that overkill is, in part, what makes this thing so darn magical. More on that later.
My particular unit is filled with eight 3TB drives. That means I have 24 terabytes of usable space, before I started configuring how to divvy it up. Thanks to the choices I’ve made, I have roughly 15 terabytes of useable storage space for everyday stuff.
What do I do with it?
It turns out having 24 terabytes of storage in your home lets you do some interesting things.
Time Machine Backups
It would be bananas not to use this massive external disk array for storing Time Machine backups of our Macs. Synology has a Time Machine server that I’ve never had a problem with. Since the Synology is always on, I never have to remember to plug in an external drive to back up to.
Archives
Once I got my Synology, I started moving things that I had stored on optical discs to the Synology. For example, the DVD we got with all of our wedding photos immediately got backed up to the Synology. Previously, I didn’t feel like it was worth losing several gigs of useful storage space on my computer to hold something I don’t access very often.
Thanks to the Synology, if the question is ever “is this worth keeping?”, the answer is always “yes”. That’s quite a bit more powerful than it initially seems; there have been plenty of times I’ve gone back to things I would have previously deleted and used them later on. I can’t say there’s been anything “mission critical”, but certainly plenty of things I was happy to still have. If I want to, I can go onto the Synology and look at some of the assignments I completed for college, over a decade after graduating.
Furthermore, it’s also nice to have a local backup of my Dropbox, just in case, which is managed automatically by the Synology.
Photo Storage
Furthermore, not too long after getting our Synology, we had our baby. That meant the quantity of photos we took rose exponentially. Since we have effectively infinite storage to place these photos in, I have the luxury of being far less aggressive when culling them. I’ve often returned back to photos taken months ago and found a photo—one I waffled over during culling—that I absolutely love now.
Video Storage
The best feature of infinite storage, however, has to be my multimedia library. I’ve waxed poetic about Plex many times on this site. Without a large external hard drive, or a NAS, Plex would be a nonstarter. I wouldn’t have the storage space to store all my media. Thanks to the Synology, all of our BluRays are available to us anywhere we have an internet connection, anytime.
VPN
As I mentioned earlier, the Synology (and most NAS boxes) are more than just dumping grounds for your ones and zeroes. The Synology is also a computer, and it can do… computer-y things. Having an always-on box that is at my beck and call is more useful than I initially imagined.
Have you ever been out of the house, and really needed to connect to your computer at home? Have you ever been at a coffee shop, and didn’t trust the unencrypted WiFi connection? Have you ever worked at an office with draconian acceptable use policies that forbid you from even sending a message to a friend on Facebook? My Synology can fix all of those problems, thanks to it also acting as a VPN server.
Downloads
Have you ever wanted to download a big file, or a series of files, but not have to worry about leaving your laptop up and running? Or, perhaps, you’re on a crummy or metered internet connection, but want something waiting for you when you get home? Have you ever wanted to have a device catch something that fell off the back of a truck? I can’t say I have, but if I did, my Synology could do all of those things.
Thanks to the Synology’s Download Station app, I can log into my Synology remotely,
give it a URL (or torrent/magnet link, or nzb, if any of those are your thing)
and have it download on my home connection. The file will be waiting for me when I
get back home.
What should you get?
For most home users, you may find that the DS216j is a better fit. Or maybe not. It’s only two-bay, which is a bummer, but it still allows for all the things my 1813 does.
Plex has an installation for my Synology, but in my experience, the Synology’s CPU isn’t fast enough to transcode video on the fly. Thus, I use my iMac to be my Plex server, while all the media sits on the Synology. In fact, few Synology models seem to have the horsepower to do live transcoding. There is a handy Google Sheet that Plex maintains to catalog which NAS devices can handle live transcoding. Cross-reference that if you’d like to run your Plex server on your Synology.
If you don’t want a Synology, I’ve heard mostly good things about Drobos. I don’t have the faintest idea what to pick though; I’ve never owned one.
How did I set it up?
I can’t stress enough that this is simply my setup. I’m not trying to be prescriptive; you may find a wildly different setup works best for you.
There are 8 physical drives in my Synology, and I knew I wanted them to serve two different purposes:
- Time Machine backups
- General storage
Pretty much any NAS can use one or more mechanisms to treat multiple physical drives as one effective drive. Generally, most RAID levels are supported, and often NAS manufacturers will provide one or more proprietary options. Given this, it seemed logical to me (and mostly on Marco’s recommendation), to split them as such:
- Drives 1 & 2 → Time Machine
- Drives 3-8 → Storage
Time Machine Volume
For the first volume, which is physical drives 1 & 2, it will store backups of other devices. While I don’t wish to lose the data on this volume, if I did, it’s not a big deal. Thus, I chose to use RAID 0. RAID 0 gives me one volume that is the size of the sum of all the disks. It does not give me any redundancy or fault tolerance. If something goes wrong on one disk, I lose everything.
Most sane computer users will tell you RAID 0 is never a good idea. They’re probably right. Since this volume is simply redundant data, I don’t need it to be super-redundant as well. You may choose differently. Like I said, there are many choices, but these are mine.
General Storage Volume
For the second volume, which is the remaining six physical drives, I do want some modicum of redundancy. I want to be able to lose one of the drives of the six without losing the whole volume. Should I lose two simultaneously, the volume will fail. That would be really crummy, but I’m willing to take that chance. I have a backup drive on-hand for quick replacement, and I want to have as much storage space as possible while still having some redundancy.
For my general storage volume, I chose Synology Hybrid Raid. SHR allows me to have one disk redundancy (as mentioned above) while still allowing me to use the maximum amount of space for the remaining five disks. Furthermore, should these disks not all share the same capacity, SHR allows for that, giving me the maximum possible storage while still having one-disk redundancy.
Backups
Once you get all this critical data onto your NAS, you should probably think about backing the entire NAS up to somewhere else. Preferably, somewhere outside your house. For NASes as big as mine, that means some sort of offsite, internet backup.
To do so, you have a not-so-fiddly option, a fiddly option, and then a bunch of super fiddly options.
Not-so-fiddly: CrashPlan. Set it up on your Mac, mount your storage drive as a network mount on your Mac, and then point CrashPlan at it. The CrashPlan app is hilariously bad, but it’s super hands-off. I believe there may be a way to have the Synology itself do its own backups, but I’ve not tried it.
Fiddly: Backblaze’s B2. It’s not as straightforward as CrashPlan, and it’s considerably more expensive. However, their client is definitely supported natively on the Synology, and from what I’m told their Mac client is not a dumpster fire, unlike CrashPlan. Some basic steps for what to do can be found in this tweet.
Super Fiddly: I know there’s ways to backup to things like Amazon Glacier but I’ve not even begun to consider messing with that.
Power Redundancy
Since you have all this data on spinning disks with ridiculously close tolerances, it’s of your best interest not to let a power spike nor sudden power loss get to it. I strongly recommend hooking your NAS up to an Uninterruptible Power Supply. I happen to use this one, but really you can choose whatever suits your needs.
For most popular UPS brands, such as APC, you can connect the Synology to the UPS via USB. The Synology will automatically recognize that it’s connected to a UPS; you can now tell the Synology to turn itself off when the UPS is running out of charge. Thus, graceful shutdown is all but guaranteed.
For an Alternative Take
After writing this post, my friend Katie Floyd wrote her own summary of how she uses her Synology. Included in her list is Surveillance Station, which I’m not using, but have independently heard works really well.
Summary
To buy a DS1813+ is not cheap, and to fill it with 3TB drives is even worse. I’m very lucky to have received one for free. Had I not been given this one, I’m not sure I ever would have spent the money on a NAS. I certainly wouldn’t have spent the money on one this massive.
However, now that I’ve tasted the NAS life, I absolutely can’t go back. Between not having to worry about whether or not I should store something, and having an always-on computer to do basic tasks for me whenever I need, it’s been phenomenally useful.
As I’ve said a few times, the choices I’ve made may not be for you. In fact, they may even be indisputably wrong. Nevertheless, these choices have given me nearly four years of worry-free NAS-enabled computing.
UPDATED 16 February 2017 7:30 AM: Added link to Katie Floyd’s writeup.
UPDATED 11 February 2017 8:00 PM: Refined Synology model name scheme, added sections on backups of the file & battery varieties.
From the it’s-obvious-but-I-don’t-want-to-believe-it department, alarming news from January’s Roundel Magazine:
Believe me when I say that I’m the biggest manual-transmission proponent within the company—but sadly, the sales figures are making it increasingly difficult to argue the case for manuals.
This comes from Tom Plucinsky, a “PR professional employed by BMW”. It’s not the first time we’ve heard distressing news on this front.
He continues:
The bottom line is this: There is really only one way to ensure the continued availability of manual transmissions in BMW models, and that’s by proving that there is demand for them.
[…]
Let’s face it: BMW is in the business of producing and selling cars that satisfy the desires of our customers. So if you want BMW to build manual-transmission cars, then you, as our hardest of hard-core enthusiasts, need to buy them—lots of them—and you need to buy them as new cars.
I bought my BMW used. I’m, arguably, contributing to the problem.
Unquestionably, the future has only two pedals. I’ve driven a Model S, and it made my car feel like the antique it really is. Nevertheless, I love driving my car because of the antiquated way it does things. I don’t expect that will change, until I lose the ability to use all four of my limbs.
Tom is right: there’s little money for BMW in manuals, and time is running out on what money is left. I can’t expect BMW to continue to build the kinds of cars I want, just because I want them.
I’m sure there’s people still using old iPods too.
In a fitting summary, more from Tom:
Buy a manual to save the manual. Pass it on.
On the evening of Thursday, January 12, I wrote this tweet:
Oppposition I’ve heard to ACA:
— Casey Liss (@caseyliss) January 13, 2017
• it cost me money
• it’s not perfect
Support:
• I would have died without the coverage it guaranteed
At the time I’m writing this, that tweet has had over 14,000 retweets and twice
as many favorites likes.
This has been… interesting.
Some random thoughts:
- I got freebooted.
Twice. Thrice.- Sadly, I’ve gotten few reports of “Whoa! Someone outside our circle retweeted you!”
- I have gotten reports of “Whoa! Someone outside our circle shared this on Facebook!”
- I wish there was a way to browse retweeters. I’m just curious to see how far
this spread. I did happen to see that Andy Richter was one of them, and
if it hit his social network, I’m curious where else it went.[1]
- Twitter’s website doesn’t seem to support this in any capacity
- Twitter analytics just gives counts, and nothing else
- Favstar allows it, but all I can see is a list of avatars, without blue checks.
- This is completely narcissistic, but I really am fascinated.
- Probably because of the company I keep, the response seemed to follow a trend
from enthusiasm → passionate enthusiasm → enthusiasm → disagreement → passionate disagreement.
- My assumption is that it got traction within my normal circle, and lived happily there for a while. Eventually, it crossed the divide into the more conservative circles, and then started to catch wind there in the same way, but as something to hate rather than like.
- I don’t know who facilitated the crossing of that divide, because I can’t see who retweeted my tweet.
- Though I had many people reply saying that ACA is wrong, for varying
reasons (more below), very few cited any actual research to back their claims.
- I’m completely guilty of this as well, as my tweet didn’t either.
- Of those that disagreed, the most odious replies were from users who shared
one or more of these traits. I’ve been around Twitter long enough to know this
is the modus operandi, but it was still fascinating to see it in action, in my
own mentions.
- Their username did not identify them, or at best, identified only their first name.
- Their specified real name was a callsign or some other name that did not
personally identify the user behind the account.
- In extreme cases, their “real names” were also obnoxious.
- Their avatar/profile image was an illustration, or perhaps an image of some thing rather than someone. Again, it did not personally identify them.
- Surprisingly few eggs.
- Interestingly, I noticed one occasion of an obnoxious, unidentifable user (except his picture, to his credit) deleting all but one of his tweets to me after we got into a heated exchange.
- Much of the disagreement has been with the principle of the Affordable Care Act
rather than the application of it. There seem to be three levels:
- I shouldn’t be forced to pay for something I do not want to have
- I shouldn’t be forced to pay to help someone else
- I don’t think these people deserve help
- This one I didn’t hear often, but I found particularly disturbing.
- Of all the opposition I’ve heard, only one scenario made any sense to me. It was best summarized by this tweet (which I quoted/retweeted):
Real Opposition to ACA:
— Stanley Rogouski (@stanleyrogouski) January 14, 2017
I pay more than I can afford for insurance with a deductible too high to matter. https://t.co/iPzX6JxMRa
- Building on this, I heard several stories of people saying “I make enough to not qualify for subsidies, but then the cost/deductibles are unaffordable at my income level”. This is a terrible situation to be in, and based only on my anecdotal evidence, is where the ACA is really failing.
It’s been interesting, though so far it’s been pretty manageable, as long as I don’t get involved. Some times I’ve been better about that than others, which is basically a summary of my entire relationship with Twitter.
I can’t help but wonder what this would have been like if I was a woman, person of color, or both. Surely whatever snark and hate I have received would have been orders of magnitude worse. I guess I just got lucky in the genetic lottery.
UPDATED 15 January 2017 10:30 PM: Added second freebooting.
UPDATED 17 January 2017 3:45 PM: Added third freebooting.
There is a
retweetersAPI, but it’s cursored, limited to 100 per call, and just generally seems like it’d be stinky to work with. I’d love for a way to ask Twitter “which verified users retweeted this tweet?”. ↩