Passwords are dumb.
I’m sorry, Ricky, but this isn’t a post about passkeys.
Instead, it’s a post about OpenID Connect, and more specifically,
tsidp. But, much like a recipe found online, we’ll get there.
Over the last several years, I’ve recently become more and more of a “homelabber”. Your definition may vary, but to me, it means that I’m running more and more server or server-like applications and devices in my house.
Over the last couple weeks, I’ve made some significant changes to the hardware in my homelab, which has encouraged me to reevaluate some of the software choices I’ve made as well.
I may talk about this more here, and will certainly talk about it on ATP at some point, but the short-short is that I “repatriated” a NUC that I had stationed at a friend’s in Connecticut so that I could slurp up TV to watch Giants games. Once it was back in the house, I installed Proxmox (new to me!) and… things snowballed fast.
Last night, I was somehow reminded of a video by my friend Alex. In it, Alex explains that, for Tailscale users like myself, you’ve already established who you are, as long as you’re logged into your tailnet. Why not leverage that known identity for authorization?[1]
Enter tsidp. This is a very small and straightforward OIDC
identity provider. Said differently, your applications in your
homelab can ask “who is this person?”, and tsidp can answer.
At that point, that account’s permissions are controlled within
the app in question.
I started down this road with Proxmox, which was very straightforward, since Alex covered specifically that in his video. I followed Proxmox with trying to figure out where else I could leverage OIDC, and found that Portainer supports it as well. As does Paperless-ngx. Both of these were a touch squishy to get configured properly, so I thought I’d share how I got them working here.
I’ll assume you can handle the tsidp side on your own; I’m
concentrating on just the configuration on this side for this post.
Portainer
Let’s assume that your Tailnet name is smiley-tiger.ts.net, and
you’ve set up tsidp at idp.smiley-tiger.ts.net. Naturally, you’ll
need to change these for the particulars of your install/tailnet.
In Settings → Authentication:
- Select
OAuthas yourAuthentication method - Turn on
Use SSO. I recommend leavingHide internal authentication promptoff, for safety’s sake - Leave defaults until you get to the
Provider, where you’ll selectCustom. - For the OAuth Configuration, use the following. For URLS, note that trailing slashes are not used:
- Client ID and Client secret from
tsidp - Authorization URL
https://idp.smiley-tiger.ts.net/authorize - Access token URL
https://idp.smiley-tiger.ts.net/token - Resource URL
https://idp.smiley-tiger.ts.net/userinfo - Redirect URL
Your Portainer URL, such ashttps://portainer.smiley-tiger.ts.net - User identifier
preferred_username - Scopes
email openid profile
- Client ID and Client secret from
After you set all those settings, you should be able to connect with
tsidp by simply tapping the large Login with OAuth button.
Note that, as usual, you’ll likely need to bless the account you just created with privileges using your previous, internally authorized, account.
Paperless-ngx
This one was quite a bit less straightforward. Previously unbeknownst to me, Paperless runs on Django, so the configuration for OIDC is basically pulled from there.
To configure this in Paperless, you need to set some environment
variables. I’m using Docker Compose, so in my environment
clause, I added the following:
environment:
  PAPERLESS_SOCIALACCOUNT_PROVIDERS: >
    {
        "openid_connect": {
        "APPS": [
            {
                "provider_id": "tailscale",
                "name": "Tailscale",
                "client_id": "{{YOUR_CLIENT_ID}}",
                "secret": "{{YOUR_SECRET}}",
                "settings": {
                    "server_url": "https://idp.smiley-tiger.ts.net"
                }
            }
        ]
        }
    }
After doing so, and setting things up in tsidp as I had before,
I was faced with errors on the tsidp side, about a mismatch
callback URL. After much trial and error, I discovered I needed
to add another valid URL to tsidp. This is how I ended up:
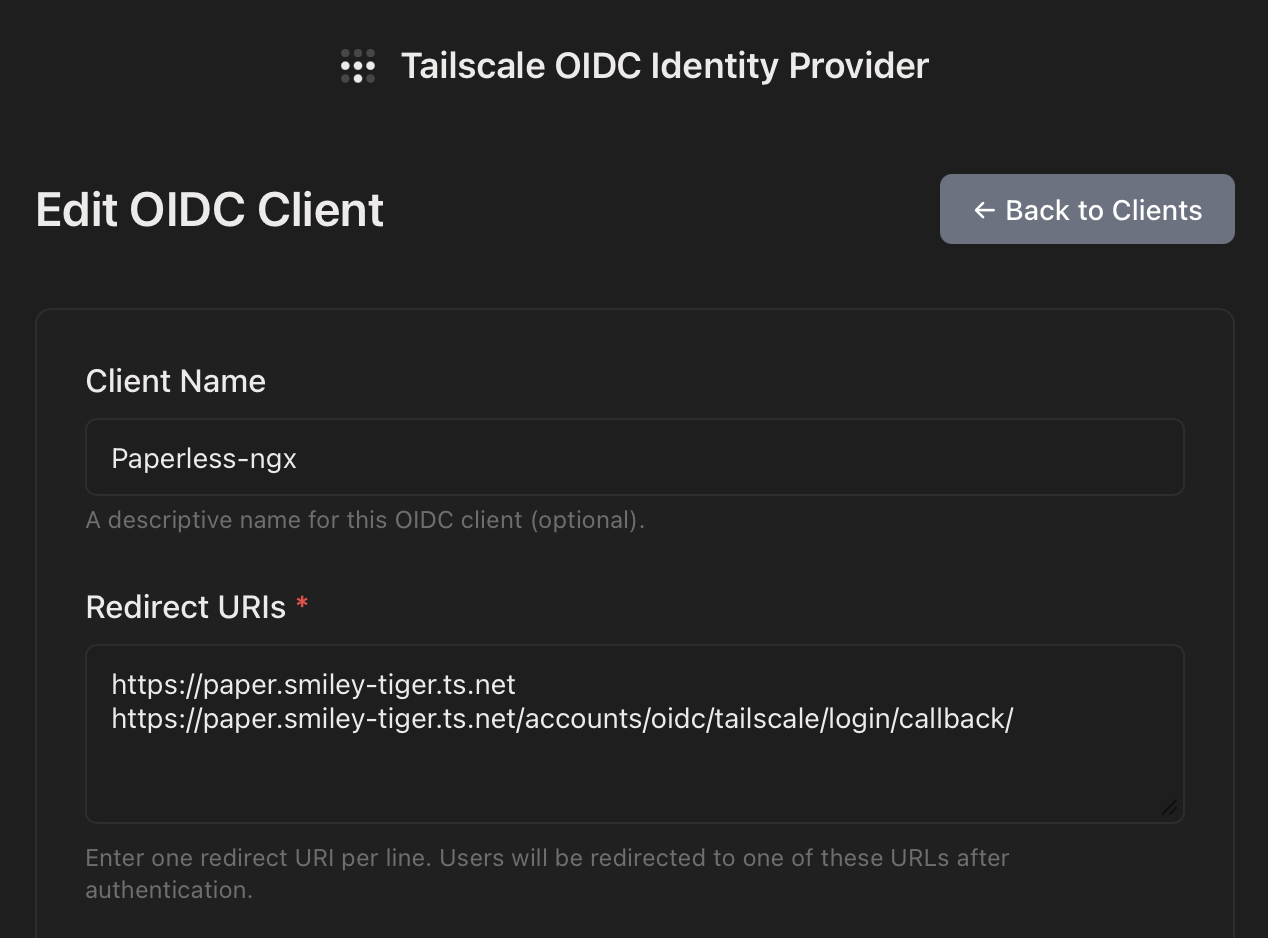
The key here was the second URL:
https://paper.smiley-tiger.ts.net/accounts/oidc/tailscale/login/callback/
Note a couple things about this URL:
- The
tailscaleyou see there is theprovider_idyou specified in the environment variable above - You actually do need the trailing slash in this case
Once I had that set, I was able to log in. As with Proxmox and Portainer, I then had to bless that new user with Administrative privileges, and then I was off to the races.
The Future
At this point, I think I’ve enabled OIDC for everything I can. There’s a suite of other apps I’d love to use OIDC for, but apparently it’s not supported yet. (IYKYK)
That said, I can now log into Proxmox, Portainer, and Paperless-ngx — all the P’s! — without having to enter a password. And that’s pretty rad.
I’m no security professional, and it wouldn’t surprise me if I’m getting these terms slightly wrong. Just roll with me here. ↩